全国统一热线:
028-86758058
18980748058
购买流程
付款方式
常见问题
在线提问
续租服务
购物车(
0
件)
用户名:
密 码:
记住
首 页
HOME
域名注册
DOMAIN
虚拟主机
WEB HOST
成品网站超市
AUTO Site
VPS主机
VPS SERVER
云 主 机
CLOUD HOST
租用托管
SERVER
海外主机
HK HOST
代理专区
AGENT
客服中心
SERVICE
IDC资讯
SERVICE
欢迎光临天府快车,我们将竭诚为您提供最优质的服务!
中文域名
域名转入
域名转出
DNS管理
动态域名
获取域名证书
域名停放
域名过户
集群主机
双线主机
基本主机
港台主机
论坛主机
Linux主机
Vip合租主机
超G型主机
ASP.net主机
Java主机
智能建站主机
网店主机
美国主机
数据库
成品网站超市
智能建站主机
集群VPS主机
国内VPS主机
香港VPS主机
美国VPS主机
云主机介绍
云主机购买
服务器租用
主机托管
常见问题
香港主机
港台主机
美国主机
国内免备案
步骤流程
代理级别
代理合同
代理模式
代理优势
在线申请
产品列表
常见问题
代理商分布图
常见问题
有问必答
跟踪提问
购买流程
产品价格
付款方式
常用软件
网站备案
续租服务
汇款确认
相关文档
联系我们
IDC资讯
行业资讯
网站运营
站长百科
IDC新闻
域名资讯
云计算
虚拟主机
您当前的位置:
首页
>
站长百科
>
服务器技术
Windows下安装squid的步骤详解
时间:2015-01-18 来源:互联网 作者:佚名
一.下载squid for windows
下载地址:
http://www.acmeconsulting.it/SquidNT.html
http://www.jb51.net/softs/43599.html
二.Windows下安装squid与配置
1.解压squid-2.6.STABLE6-NT-bin.zip到C:\squid
2.单击[开始],选择“运行”,输入 cmd ,在命令提示符窗口内输入以下命令:
C:\>cd c:\squid\etc
C:\squid\etc>copy squid.conf.default squid.conf
**将Squid的默认配置文件复制一份并起名为squid.conf
C:\squid\etc>copy mime.conf.default mime.conf
**将mime.conf.default复制一份并起名为mime.conf
3.编辑squid.conf,根据需要添加和修改以下内容
http_port 3128 ;定义squid监听端口
visible_hostname tianwei-itrus :定义机器名
cache_mem 64 MB ;定义代理
服务器
缓存
acl all src 0.0.0.0/0.0.0.0
acl manager proto cache_object
acl localhost src 127.0.0.1/255.255.255.255 :定义本地网络为localhost
acl outnetwork 192.168.10.0/255.255.255.0
acl SSL_ports port 443
acl Safe_ports port 80 # 定义http端口
acl Safe_ports port 21 # 定义ftp端口
acl Safe_ports port 443 # https
acl Safe_ports port 70 # gopher
acl Safe_ports port 210 # wais
acl Safe_ports port 1025-65535 # unregistered ports
acl Safe_ports port 280 # http-mgmt
acl Safe_ports port 488 # gss-http
acl Safe_ports port 1863 # filemaker
acl Safe_ports port 777 # multiling http
acl CONNECT method CONNECT
http_access allow localhost manager
http_access allow outnetwork
icp_access allow all
http_access deny !Safe_ports
http_access deny CONNECT !SSL_ports
http_reply_access allow all
icp_access allow all
http_access deny all
三.Windows下安装squid完成后,启动squid
c:\>cd c:\squid\sbin
C:\squid\sbin>squid -i (注册Squid为Windows的服务)
C:\squid\sbin>squid -z (生成高速缓存的目录)
C:\squid\sbin>squid
来顶一下
返回首页
推荐资讯
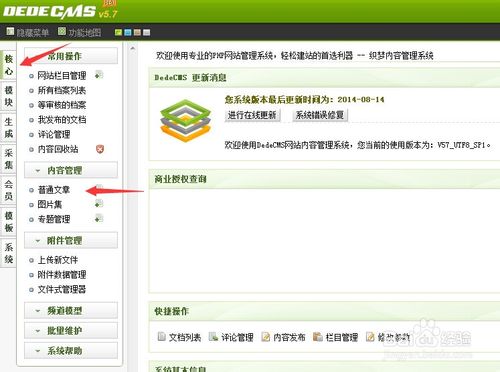
【图文教程】dede织梦网站后台如何
对于新手站长可能不了解,dede织梦后台是如何发文章的。下面
2014站长圈十大事件:PR已死 移动算
2014年即将过去,虽然站长圈相比过去几年稍显沉寂,但&ldquo
相关文章
无相关信息
栏目更新
栏目热门
返回首页
关于我们
联系我们
付款方式
价格总览
资讯中心
友情链接
媒体关注
有问必答
投诉建议
网站备案
《中华人民共和国增值电信业务经营许可证》编号:川B2-20080058号
官方网址:
www.tfkc.cn
天府快车
Copyright © 2002~2015
天府快车
版权所有
电话总机:
028-86758058
(50线) 传真:
028-86758058